
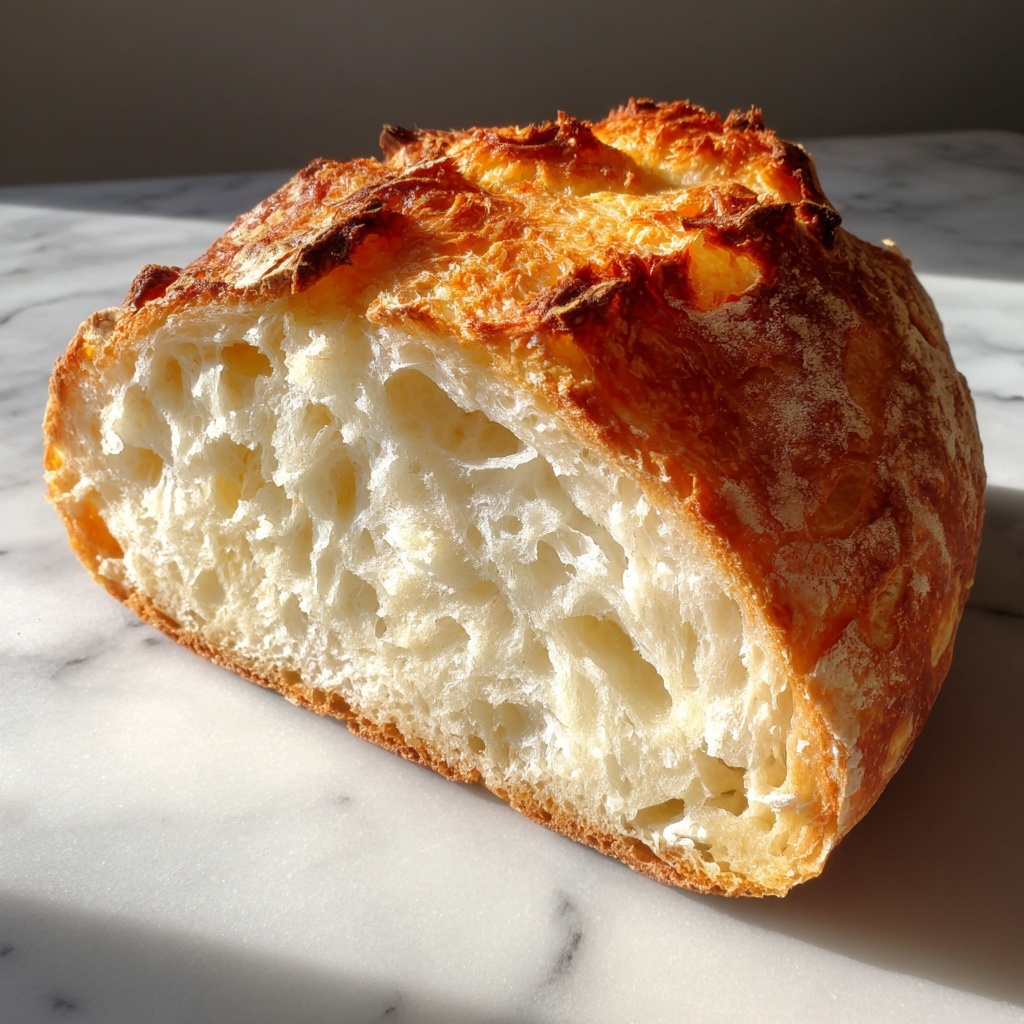
If you’ve ever missed the fluffy, soft texture of a traditional loaf while navigating gluten-free baking, you’re in for a treat. This Classic Gluten-Free White Sandwich Bread Recipe perfectly captures that comforting, cozy feeling of homemade bread, with a tender crumb and golden crust that’s just begging to be sliced and shared. It’s simple, reliable, and crafted with ingredients that come together beautifully to create a loaf that’s as satisfying as it is versatile. Whether you’re making sandwiches, toasting for breakfast, or just enjoying a fresh slice with butter, this recipe will become your new go-to for gluten-free baking bliss.

Ingredients You’ll Need
Every ingredient in this recipe plays an important role, creating a dough that is soft yet sturdy and packed with flavor. The combination might seem straightforward, but each component is essential for the perfect texture, rise, and taste of this Classic Gluten-Free White Sandwich Bread Recipe.
- Gluten-free all-purpose flour: The foundation of the bread, providing structure and a familiar “bread” flavor without gluten.
- Sugar: Feeds the yeast to help your bread rise beautifully and adds a hint of subtle sweetness.
- Salt: Enhances the overall flavor and balances the sweetness perfectly.
- Active dry yeast: The magical ingredient that gives your bread that delightful rise and airy crumb.
- Warm water: Activates the yeast and brings the dough together with the perfect moisture level.
- Olive oil: Adds richness and tenderness to the bread, keeping it moist longer.
- Eggs: Help bind the ingredients and provide structure, creating a soft and elastic dough.
How to Make Classic Gluten-Free White Sandwich Bread Recipe
Step 1: Preheat and Prepare Your Pan
Start by preheating your oven to 375°F (190°C). While it warms up, grease your loaf pan thoroughly to ensure your bread bakes to perfection without sticking. This simple step lets the bread slide right out, keeping its beautiful shape intact.
Step 2: Combine Dry Ingredients
In a large mixing bowl, whisk together the gluten-free all-purpose flour, sugar, salt, and active dry yeast. Mixing these dry ingredients first ensures that the yeast is evenly distributed throughout your flour mixture, which is key for an even rise.
Step 3: Add Wet Ingredients and Mix
Next, pour in the warm water, olive oil, and eggs. Stir everything together until you get a smooth, dough-like consistency. Don’t worry if the texture is a bite different from traditional wheat dough—gluten-free dough tends to be a little stickier but still forms a cohesive ball.
Step 4: Transfer Dough to Loaf Pan
Use a spatula to transfer the dough smoothly into your greased loaf pan. Smooth the surface gently to create an even top. This lets the bread bake uniformly and look picture-perfect once it’s done.
Step 5: Bake until Golden Brown
Pop the loaf into the oven and bake for about 40 minutes. You’ll know it’s ready when the crust turns golden brown and the loaf sounds hollow when you tap the bottom. That hollow sound is your telltale sign that this Classic Gluten-Free White Sandwich Bread Recipe has baked through beautifully.
Step 6: Cool Before Slicing
Allow your bread to cool in the pan for 10 minutes to firm up slightly, then transfer it to a wire rack to cool completely. This step is crucial to prevent the bread from becoming gummy and helps achieve a perfect crumb when sliced.
How to Serve Classic Gluten-Free White Sandwich Bread Recipe
Garnishes
Classic Gluten-Free White Sandwich Bread Recipe is delicious on its own, but you can also elevate it with a variety of garnishes. Try spreading it with creamy avocado, a smear of nut butter, or a sprinkle of sea salt and herbs for an extra burst of flavor that complements the bread’s mild taste.
Side Dishes
This bread pairs wonderfully with soups, stews, or fresh salads. Whether it’s a bowl of tomato basil soup or a hearty chicken salad, a slice of this bread is perfect for soaking up morsels or making the perfect sandwich, turning any meal into a comforting experience.
Creative Ways to Present
Take your Classic Gluten-Free White Sandwich Bread Recipe from simple to show-stopping by toasting slices and topping them with fresh tomatoes and basil for bruschetta, or layering it with your favorite deli meats and cheeses cut into elegant finger sandwiches for a gathering or party platter.
Make Ahead and Storage
Storing Leftovers
If you happen to have any bread left after your first round of slicing, store it in an airtight container or bread box to maintain its freshness. This loaf stays soft for a couple of days at room temperature, making it a convenient everyday treat.
Freezing
You can freeze your loaf whole or slice it beforehand to save time. Wrap the bread tightly in plastic wrap and foil or place slices in freezer bags. When you’re ready for a slice, simply thaw at room temperature or toast from frozen for quick enjoyment.
Reheating
To bring your bread back to life, toast slices lightly or warm the whole loaf wrapped in foil at 350°F (175°C) for 10-15 minutes. This refreshes its soft texture and enhances the flavor as if freshly baked.
FAQs
Can I substitute other gluten-free flours for the all-purpose blend?
While this recipe is designed for a gluten-free all-purpose flour blend, you can experiment with oat flour or rice flour blends, but results might vary in texture and rise. It’s best to stick with a reliable blend for consistent results in this Classic Gluten-Free White Sandwich Bread Recipe.
Do I need to proof the yeast before mixing?
You don’t have to proof the yeast separately since it activates directly in the warm water combined with sugar. Just ensure your water is warm, not hot, to keep the yeast alive and happy.
Can I make this bread dairy-free?
Absolutely! This recipe doesn’t call for any dairy ingredients, so it’s naturally dairy-free. The olive oil adds moisture and richness without needing butter or milk.
Why is my gluten-free bread dense instead of fluffy?
Gluten-free bread can sometimes turn out denser due to the lack of gluten structure. Make sure you accurately measure flour, use fresh yeast, and follow the baking and cooling times carefully. This Classic Gluten-Free White Sandwich Bread Recipe balances everything for a soft, airy result.
How long does the bread keep fresh?
When stored properly in an airtight container, the bread stays fresh up to 2-3 days. For longer storage, freezing is your best option to preserve freshness and texture.
Final Thoughts
Baking your own Classic Gluten-Free White Sandwich Bread Recipe is such a rewarding experience, and once you give it a try, you’ll find it hard to go back to store-bought versions. It’s wholesome, comforting, and made with simple ingredients that come together effortlessly to produce a loaf everyone can enjoy. I can’t wait for you to taste the soft crumb and golden crust that make this recipe a true kitchen favorite!
Print
Classic Gluten-Free White Sandwich Bread Recipe
- Prep Time: 15 minutes
- Cook Time: 40 minutes
- Total Time: 55 minutes
- Yield: 1 loaf (serves approximately 8 slices)
- Category: Bread
- Method: Baking
- Cuisine: American
- Diet: Gluten Free
Description
This Classic White Sandwich Bread recipe is a simple, gluten-free loaf that yields soft, fluffy bread perfect for sandwiches. Made with gluten-free all-purpose flour, olive oil, and eggs, this bread offers a delicious alternative to traditional wheat bread and is ideal for those with gluten sensitivities or anyone looking for a tasty homemade bread option.
Ingredients
Dry Ingredients
- 2 cups gluten-free all-purpose flour
- 1 tablespoon sugar
- 1 teaspoon salt
- 1 tablespoon active dry yeast
Wet Ingredients
- 1 cup warm water
- 2 tablespoons olive oil
- 2 eggs
Instructions
- Preheat Oven and Prepare Pan: Preheat your oven to 375°F (190°C) and grease a loaf pan to prevent sticking.
- Combine Dry Ingredients: In a mixing bowl, whisk together the gluten-free all-purpose flour, sugar, salt, and active dry yeast until well blended.
- Add Wet Ingredients: Pour warm water, olive oil, and eggs into the dry mixture. Mix thoroughly until a smooth, uniform dough forms.
- Transfer Dough to Pan: Pour the dough into the prepared loaf pan and smooth the surface evenly with a spatula to shape the loaf.
- Bake the Bread: Place the loaf pan in the oven and bake for 40 minutes, or until the bread turns golden brown and sounds hollow when lightly tapped.
- Cool the Bread: Remove the bread from the oven and let it cool in the pan for 10 minutes. Then, transfer it to a wire rack to cool completely before slicing.
Notes
- Ensure the water is warm, not hot, to activate the yeast properly without killing it.
- You can substitute olive oil with another mild-flavored oil if preferred.
- Letting the bread cool completely before slicing helps maintain its texture.
- Store bread in an airtight container to keep it fresh longer.
- For a softer crust, you can brush the top with melted butter after baking.


